Introduction
The Eagle Eye Networks API v3 uses the OAuth2 "Authorization code" grant type to authenticate a user. This can be used to connect an Eagle Eye user with a third-party system.
The goal of this guide is to explain how to authenticate using the OAuth2 "Authorization code" grant type to get a set of tokens. These tokens can be used directly by a third-party application, and can also be used for backend-to-backend API calls between the Eagle Eye Video API Platform and a third-party system.
ImportantEagle Eye users must manually grant access to third-party applications. This process cannot be automated. Once access is granted, the application will have access to the account for 7 days.
If you require access for a longer period, consider exploring Machine-to-Machine (M2M) integration options.
Before you begin
- Create your application in the Eagle Eye Developer Portal and obtain your client ID and client secret. For more instructions, see the Client Credentials page.
- Add your application's redirect URI to the OAuth whitelist. You must include the protocol (
https\://orhttp\://) in the entry. For testing with localhost IP, it has to be, for example:http://127.0.0.1:3333.
End Users Should Never See Your Client CredentialsClient Credentials are how the Eagle Eye Video API Platform identifies the specific application that is accessing an end user account. End users should never have to create or enter Client Credentials as part of any integration process. The application developer should be the only entity with access to such credentials.
Procedure
- Make the request as HTTP
POSTor HTTPGET, or go to your browser of choice. - Redirect the user to
auth.eagleeyenetworks.com, to the login screen with the URL shown below:
'https://auth.eagleeyenetworks.com/oauth2/authorize?scope=vms.all&client_id=`{clientId}`&response_type=code&redirect_uri=`{URI with http(s)://}`' /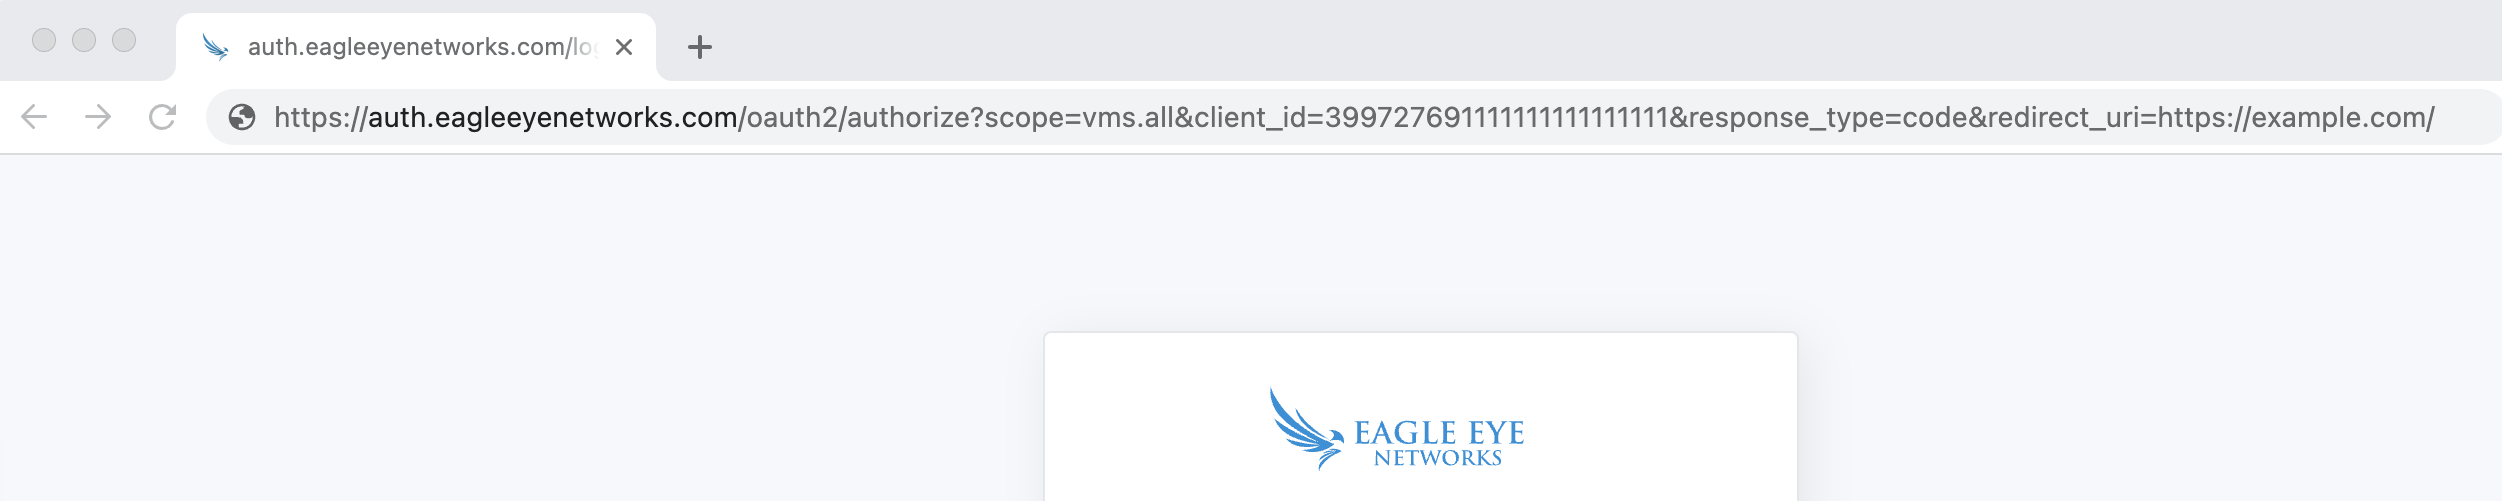
The {client_id} value should be the client ID, part of the Client Credentials. Always ensure that your client secret remains private.
ImportantThe redirect URI must exactly match the one in the example (
http://127.0.0.1:3333). Since whitelist checking is based on string comparison, any other formats, such ashttps://127.0.0.1:3333orhttp://localhost:3333or127.0.0.1:3333/will not work.
- If the user is not yet logged in, they need to log in to Eagle Eye Networks on the following screen:
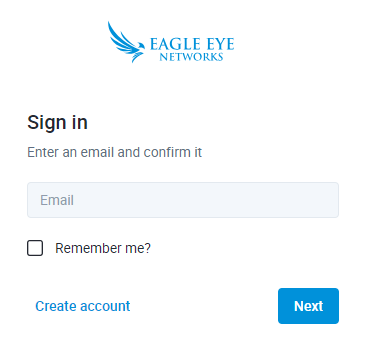
After logging in, the user is redirected to the redirect URI with an additional code parameter: <redirect_uri>?code=<code parameter>, for example: https://example.com/?code=AbCdEf.
- Use this code to get the access token and refresh token. To do this, make an HTTP
POSTrequest to "https://auth.eagleeyenetworks.com/oauth2/token" with the following parameters:
grant_type: "authorization_code"scope: "vms.all"code: The code parameter from the previous stepredirect_uri: The redirect URI with http(s)://
You must authenticate the request with your Client Credentials. The Authorization header uses basic access authentication with the client_id and client_secret serving as the username and password. The client_id and client_secret must be encoded with Base64 and joined by a single colon.
You can see an example of this request below:
curl --request 'POST' \
  --url 'https://auth.eagleeyenetworks.com/oauth2/token' \
  --header 'accept: application/json' \
  --header 'content-type: application/x-www-form-urlencoded' \
  --header 'authorization: Y2xpZW50SWQ6Y2xpZW50U2VjcmV0' \
  --data '
{
  "grant_type": "authorization_code",
  "scope": "vms.all",
  "code": "`{code}`",
  "redirect_uri": "`{URI with http(s)://}`"
}
'
import requests
url = "https://auth.eagleeyenetworks.com/oauth2/token"
data = {
"grant_type": "authorization_code",
"scope": "vms.all",
"code": "`{code}`",
"redirect_uri": "`{URI with http(s)://}`"
}
headers = {
"accept": "application/json",
"content-type": "application/x-www-form-urlencoded"
}
response = requests.post(
url,
headers=headers,
auth=(
'CLIENT_ID',
'CLIENT_SECRET'
),
data=data
)
print(response.text)package main
import (
"bytes"
"encoding/json"
"fmt"
"net/http"
"net/url"
"io"
)
func main() {
url := "https://auth.eagleeyenetworks.com/oauth2/token"
data := url.Values{}
data.Set("grant_type", "authorization_code")
data.Set("scope", "vms.all")
data.Set("code", code)
data.Set("redirect_uri", fmt.Sprintf("http://%s:%d", hostName, port))
req, _ := http.NewRequest("POST", url, bytes.NewBufferString(data.Encode()))
req.Header.Add("accept", "application/json")
req.Header.Add("Content-Type", "application/x-www-form-urlencoded")
req.SetBasicAuth(clientId, clientSecret)
res, _ := http.DefaultClient.Do(req)
defer res.Body.Close()
body, _ := io.ReadAll(res.Body)
fmt.Println(string(body))
}
Important
- Make sure to add the
accept application/jsonheader to the HTTPPOSTrequest.- The
content-typeheader should be set toapplication/x-www-form-urlencoded.- Make sure the redirect URI parameter is the same as in the previous request, otherwise the request fails.
- If a refresh token is required, make sure you perform this API call with your application server, and not in the browser. If you perform this API call in the browser, you will expose your API key and the user's refresh token.
- The Authorization header uses basic authentication. Make sure to encode your
<client_id>:<client_secret>with Base64.- All parameters must be sent in the request body as JSON. Query parameters are not supported.
In response, you'll receive an access token and a refresh token. The access token can be used to authenticate API calls while the refresh token can be stored for future use. This way the user does not have to sign in again. This can also be used for mobile applications that can store the refresh token in a keychain.
Example Response:
{
    "access_token": "eyJraWQiOiI2ODYxYjBjYS0wZjI2LTExZWQtODYxZC0wMjQyYWMxMjAwMDIiLCJ0eXAiOiJKV1QiLCJhbGciOiJSUzI1NiJ9.eyJzdWIiOiJjYTBmNjFhYiIsImF1ZCI6InZtcy5hcGkiLCJpc3MiOiJ2bXMuYXV0aC52MSIsInZtc19hY2NvdW50IjoiMDAwMDExMDYiLCJleHAiOjE2NjAzNjA0ODksImlhdCI6MTY2MDMxNzI4OSwianRpIjoiODJlNWMyMDQ1OTM1OTczNGYyOTU4NjlkZDhlYzIyMDMiLCJjbGllbnRfaWQiOiJCTVRPLVRFU1QiLCJ2bXNfY2x1c3RlciI6ImMwMDAifQ.JuUiozX0XMKz0kuFJTGsNFRdxOKNV4R6iRW8t6N-FpElU4sWBLhyioIot3dV2GFnHWpY5wzdFWuwVxuSvYRwhPGs6sYt4Uo0pWsrI6a9WylyavacjSmLuljdnplUzKuoB3BzohCrQGCUmiMFJ8eA4jNZnViuQ7ouKRoM4mbTSdwy_YUoNm4F7GDBiHp6TEoMFscUDlWzC-GJwVMklRGAAw_9OTTl-CGWt-CngqL1K-2Qt-3iS0WY1Jpal3-YMlJ1FVTDDuCgVIluemaH2g7ScEOM5vEnpj31H_6Gu7R9NB5CDzLaEDm2MHRJThId1-3kyhreG3Ux-WV2TAOzGbLnkg",
    "expires_in": 43198,
    "httpsBaseUrl": {
        "hostname": "api.c001.eagleeyenetworks.com",
        "port": 443
    },
    "refresh_token": "w1P0nwA7NEZmo5tEd76cco3y5bi4Js6QNgZsXnFNBDRepnJmA2F73tGJ4G_eA0WttI_8xsovsFLvd5uOUayqrNwu7PZ1SH0DAWVZ3",
    "scope": "vms.all",
    "token_type": "Bearer"
}Result: You obtained the access token and Base URL. The returned access token can be used for accessing the user data. For example, to get a camera overview or recording.
OAuth Implementation Example
The following recipe demonstrates how to implement OAuth2 in multiple programming languages.